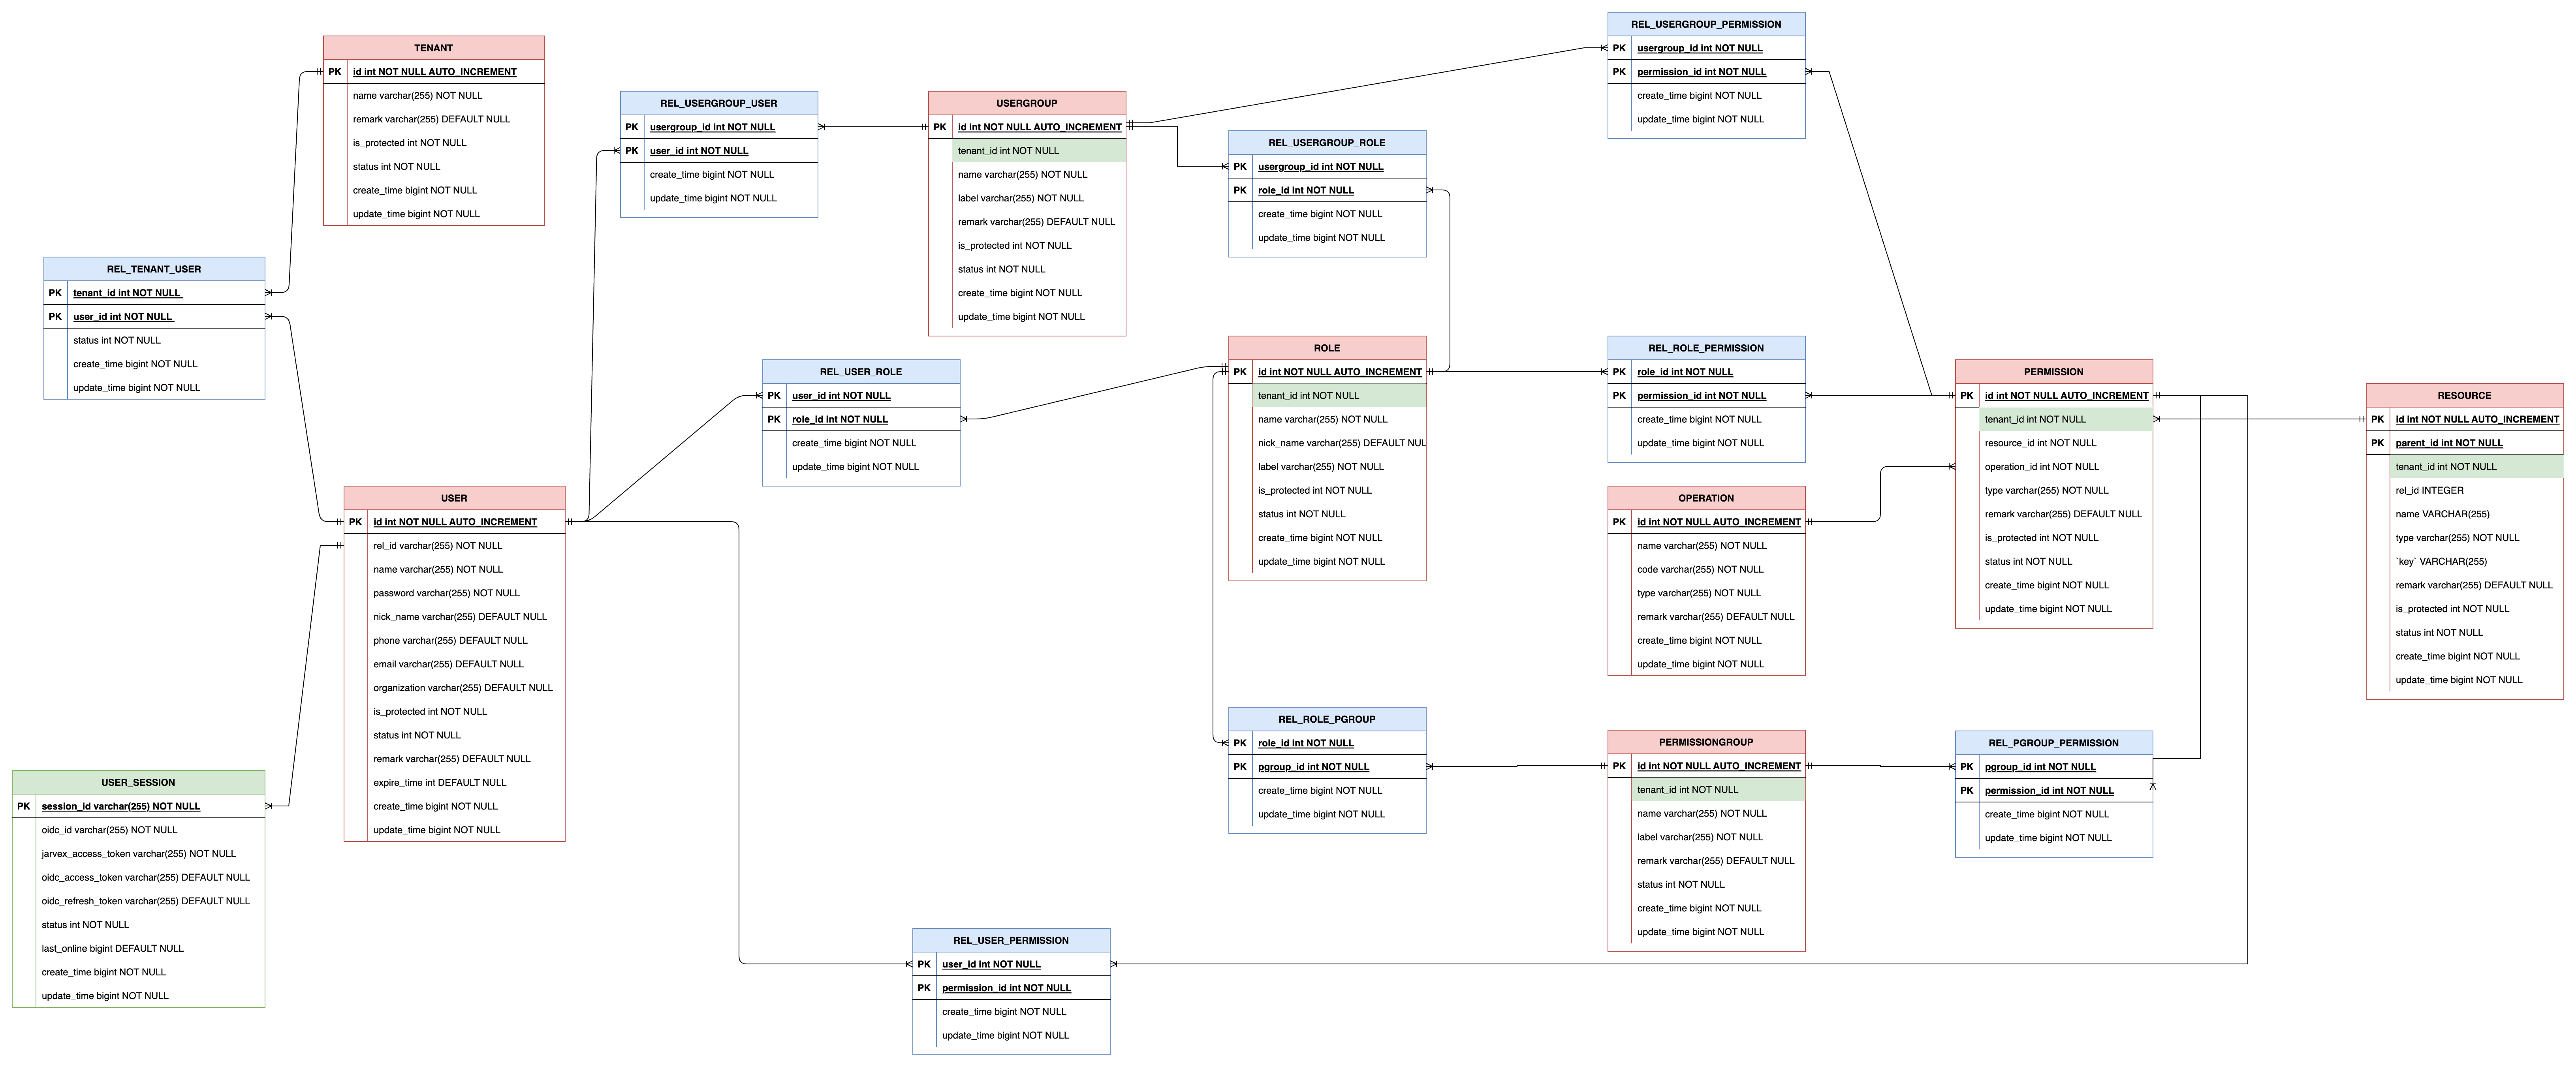
security model
Access control list (ACL)
Context-based access control (CBAC)
Harrison-Ruzzo-Ullman (HRU)
Lattice-based access control (LBAC)
Mandatory access control (MAC)
Multi-level security (MLS)
Role-based access control (RBAC)
reference
SSO (single sign-on)
oauth2
OAuth 2.0 terminology
- Resource Owner: Entity that can grant access to a protected resource. Typically, this is the end-user.
- Client: Application requesting access to a protected resource on behalf of the Resource Owner.
- Resource Server: Server hosting the protected resources. This is the API you want to access.
- Authorization Server: Server that authenticates the Resource Owner and issues Access Tokens after getting proper authorization. In this case, Auth0.
- User Agent: Agent used by the Resource Owner to interact with the Client (for example, a browser or a native application).
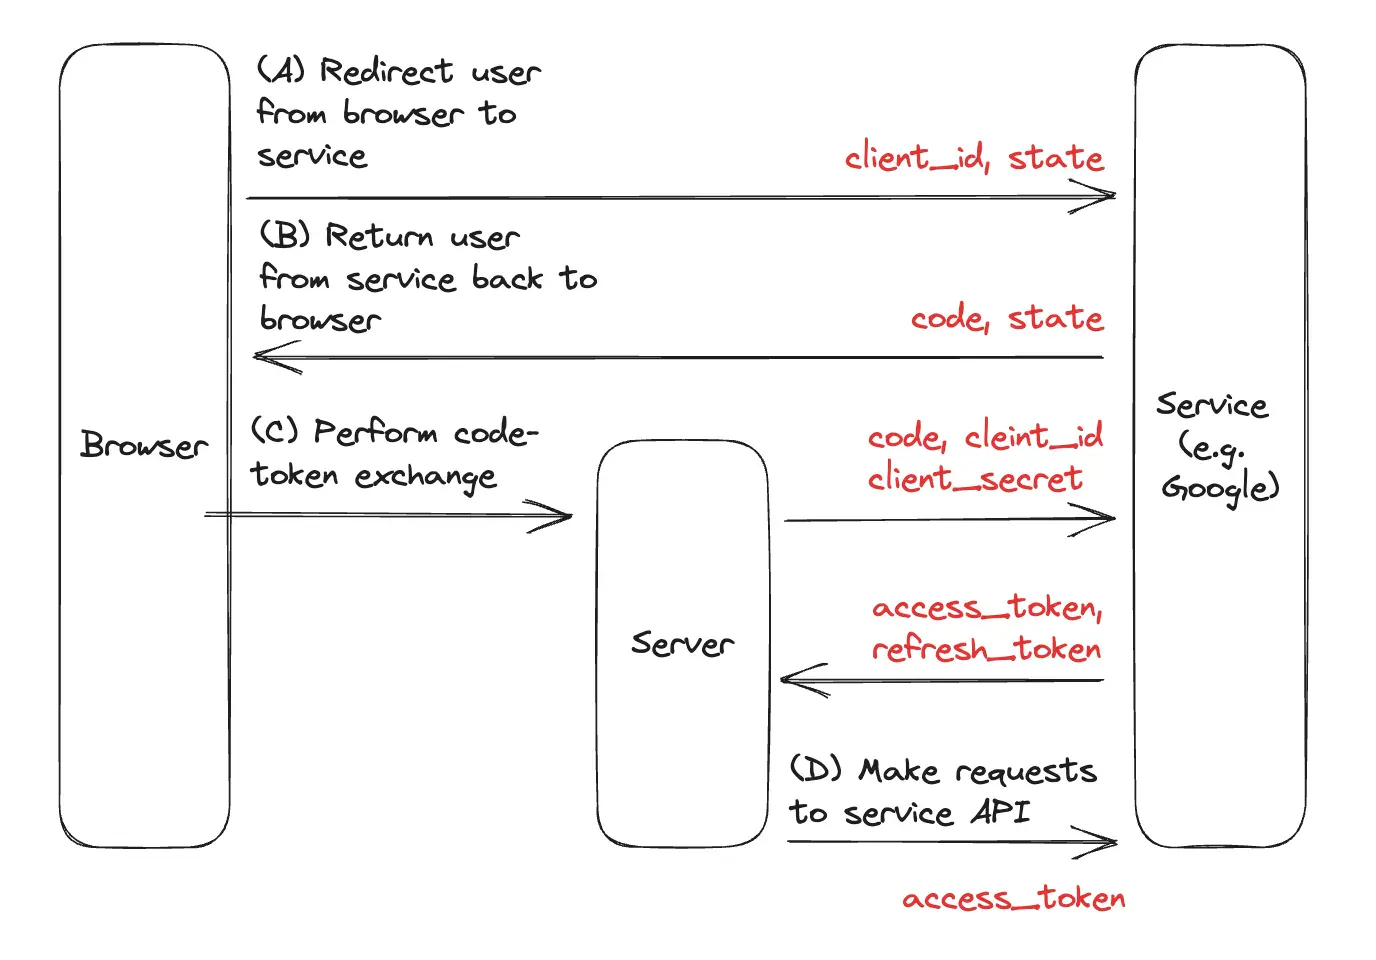
The best practice for implementing OAuth2 in a web application with a separate frontend and backend is to use the Backend for Frontend (BFF) pattern. Here’s how it works:
The frontend (e.g. a Single Page Application) initiates the OAuth2 flow by redirecting the user to the OAuth2 provider’s authorization endpoint. The provider then authenticates the user and redirects back to the frontend with an authorization code.
The frontend then sends this authorization code to the backend over a secure channel (e.g. HTTPS). The backend acts as a confidential client and exchanges the authorization code with the OAuth2 provider for an access token and refresh token.[1][3]
The backend stores the tokens securely and returns an opaque session cookie or token to the frontend. This session identifier represents the authenticated user session.[1]
For subsequent API requests, the frontend includes the session cookie/token. The backend validates the session and retrieves the access token, using it to authenticate the request to the backend API or other third-party APIs on behalf of the user.[1][3]
This pattern has several advantages:
The access token is never exposed to the frontend, mitigating the risk of token theft.[1][3]
The backend can securely store and manage the refresh of access tokens without involving the frontend.[3]
The backend can act as a gatekeeper, validating requests and enforcing authorization rules before proxying to third-party APIs.[3]
The frontend only needs to handle the initial OAuth2 redirect and session management, simplifying its code.[1]
To implement this, the backend must be registered as a confidential OAuth2 client with the provider. The frontend can use libraries like Auth0 or Google’s client-side libraries to initiate the OAuth2 flow.[1][4] The backend handles the code exchange and token management, often using server-side OAuth2 libraries or middleware.[1]
Citations:
[1] https://auth0.com/blog/backend-for-frontend-pattern-with-auth0-and-dotnet/
[2] https://community.qlik.com/t5/New-to-Qlik-Analytics/How-to-Secure-Backend-API-Endpoints-on-the-Front-End-Best/td-p/2423853
[3] https://auth0.com/blog/the-backend-for-frontend-pattern-bff/
[4] https://infisical.com/blog/guide-to-implementing-oauth2
[5] https://www.reddit.com/r/node/comments/skmjjn/0auth_implemented_on_frontend_or_backend/
reference
keycloak
前提
- 需要jdk9以上环境
config server
编辑
/conf/keycloak.conf,配置mysql连接信息 (mysql创建keycloak库)配置
admin cli环境变量 (方便直接命令操作,等同于界面操作)1
2
3keycloak
export KCADM="/Users/dongwei/Applications/keycloak-23.0.3/bin/kcadm.sh"
export HOST_FOR_KCADM=localhost
bootstrap
首次启动
KEYCLOAK_ADMIN=admin KEYCLOAK_ADMIN_PASSWORD=xxxxxx ./bin/kc.sh start-dev后续启动
./bin/kc.sh start-dev生效
KCADM$KCADM config credentials --server http://localhost:8080 --realm master --user admin提示输入密码即可 (1sou2sou)
验证 $KCADM get serverinfo
config realm
创建新的realm
$KCADM create realms -s realm="jarvex" -s enabled=true
config clients
1 | KCADM create clients -r jarvex -s clientId="jarvex-client-test-1" -s enabled=true -s name="test Client 1" -s protocol=openid-connect -s publicClient=true -s standardFlowEnabled=true -s 'redirectUris=["http://127.0.0.1:8001/app/*"]' -s baseUrl="http://127.0.0.1:8001/app/" -s 'webOrigins=["*"]' |
shiro
**对于一个好的框架,从外部来看应该具有非常简单易于使用的 API,且 API 契约明确;从内部来看的话,其应该有一个可扩展的架构,即非常容易插入用户自定义实现,因为任何框架都不能满足所有需求。 **
Subject
主体,代表了当前的用户
SecurityManager
安全管理器,它管理着所有Subject,相当于springmvc中的DispatcherServlet(前端控制器)
Realm
域,Shiro从Realm获取安全数据(如用户、角色、权限) ,是验证主体subject的数据源
流程如图:

流程说明:
- 应用代码通过 Subject 来进行认证和授权,而 Subject 又委托给 SecurityManager;
- 我们需要给 Shiro 的 SecurityManager 注入 Realm,从而让 SecurityManager 能得到合法的用户及其权限进行判断。
从以上也可以看出,Shiro 不提供维护用户 / 权限,而是通过 Realm 让开发人员自己注入。
shiro的内部结构如图:

身份验证
principals:身份,即主体的标识属性,可以是任何东西,如用户名、邮箱等,唯一即可。
credentials:证明 / 凭证,即只有主体知道的安全值,如密码 / 数字证书等。
- 身份认证流程

授权
授权,也叫访问控制,即在应用中控制谁能访问哪些资源(如访问页面/编辑数据/页面操作等)。在授权中需了解的几个关键对象:主体(Subject)、资源(Resource)、权限(Permission)、角色(Role)。
授权方式
编程式、注解式、jsp/gsp标签式
casdoor
deploy
docker
1
2
3
4sudo docker run -d -p 18000:8000 \
-v /usr/share/zoneinfo/Asia/Shanghai:/etc/localtime:ro \
-v /home/dingodb/dongwei/docker/timezone:/etc/timezone:ro \
casbin/casdoor-all-in-one容器内部服务端口8000,映射成对外访问接端口 18000
GPG
The GNU Privacy Guard
1 | generate |
list keys and their keygrips
1
2
3
4
5
6
7
8
9
10
11gpg --with-keygrip -K
e.g. print
/root/.gnupg/pubring.kbx
------------------------
sec rsa2048 2025-08-04 [SC] [expires: 2027-08-04]
128D44214354B7DExxx # keyid
Keygrip = C01FDE625185BE8F9Cxxx # Primary keygrip
uid [ultimate] dongwei <dongwei@xxx.com>
ssb rsa2048 2025-08-04 [E] [expires: 2027-08-04]
Keygrip = 719E26B60BF0FF119Axxx # Subkey keygrip- Primary keygrip (C01FDE6…):
This corresponds to your primary secret key. The primary key is typically used for signing (
SCmeans it can Sign and Certify). It is the main key that proves your identity and certifies subkeys. - Subkey keygrip (719E26B6…):
This corresponds to a subkey. The subkey here is labeled
E, which means it is an encryption subkey. This subkey is usually used to decrypt messages or data but is not used for signing identity or certifying keys.
- Primary keygrip (C01FDE6…):
This corresponds to your primary secret key. The primary key is typically used for signing (
distribute public keys
Keyservers Only Distribute Public Keys
check keyid
1
2
3
4
5
6
7
8
9
10
11
12
13
14
15
16
17long keyid
gpg --list-keys --keyid-format LONG
print
/root/.gnupg/pubring.kbx
------------------------
pub rsa2048/633xxxx8 2025-08-04 [SC] [expires: 2027-08-04]
12xxxxxxx8
uid [ultimate] dongwei <dongwei@zetyun.com>
sub rsa2048/C946xxxxAC 2025-08-04 [E] [expires: 2027-08-04]
full keyid: 633xxxx8
pubkey(Primary keygrip): 12xxxxxxx8
Subkey(Subkey keygrip): C946xxxxAC
short keyid
gpg --keyid-format short --list-keysDistributing keyid
keyid 均为 full key id, 注意后续有的 gradle plugin是用的short key id (取full key id的后8位)
1
2
3
4
5
6
7
gpg --keyserver keyserver.ubuntu.com --send-keys 633xxxx8
print
gpg: sending key 633xxxx8 to hkp://keyserver.ubuntu.com
check
https://keyserver.ubuntu.com/other people can import your public key from the key server to their local machine
1
2
3
4
5
6
7
gpg --keyserver keyserver.ubuntu.com --recv-keys 633xxxx8
print
gpg: /Users/dongwei/.gnupg/trustdb.gpg: trustdb created
gpg: key 633xxxx8: public key "dongwei <dongwei@zetyun.com>" imported
gpg: Total number processed: 1
gpg: imported: 1
transfer private key
optional 1
export secret info (ASCII-armored format (text readable))
origin server
1
gpg --armor --export-secret-key 633xxxx8 > private.gpg
import secret info
other server
1
2
3
4
5
6
7
8
9
10
gpg --import private.gpg
generete secret binary file in ~/.gnupg/private-keys-v1.d/
print
gpg: key 633xxxx8: "dongwei <dongwei@zetyun.com>" not changed
gpg: key 633xxxx8: secret key imported
gpg: Total number processed: 1
gpg: unchanged: 1
gpg: secret keys read: 1
gpg: secret keys imported: 1注意:如果是普通用户导入secret key,需要在tmux中进行导入,因为非tmux环境 The terminal device (TTY, e.g.,
/dev/pts/X) is not owned by the user running GPG. Check withls -l $(tty),因为只用当前拥有TTY权限,才可以 ensures GPG agent can access the terminal and has permission to generate the key.
use secret binary file in Gradle’s signing plugin
1
signing.secretKeyRingFile=~/.gnupg/private-keys-v1.d/xxx.key
optional 2
export secret file (Binary keyring file (.gpg))
1
2
3
4
gpg --export-secret-keys -o ~/.gnupg/secring.gpg
or
gpg --export-secret-keys --armor <key id> <path to secring.gpg>use secret binary file in Gradle’s signing plugin
1
signing.secretKeyRingFile=~<path to secring.gpg>