architecture

command

config
1 | list all config |
file
1 | submit specify file |
remove a specific file from the staging area
only operate commit action , not do add action)
1
2
3
4
5
6
7
8
9Undo git add for a specific file
git restore --staged /path/to/file
or
git reset /path/to/file
Undo git add . for all files
git restore --staged .
or
git resetUndo add for a specific file but keep the commit
已执行了 add 和 commit
1
2
3
4
5
6
7
8
9
10Unstage the file from the commit
git reset HEAD^ -- /path/to/file
git add .
git commit --amend
Completely restore the file to the version before commit
git checkout HEAD^ -- /path/to/file
git add /path/to/file
git commit --amendUndo the entire commit (including all files)
1
2
3
4
5
6
7
8Soft reset (keep all changes unstaged)
git reset --soft HEAD~1
Mixed reset (keep changes but unstaged)
git reset HEAD~1
Hard reset (delete commit AND file changes)
git reset --hard HEAD~1比较文件,在不同版本的区别
1
2
3
4
5
6
7
8
9
10
11
12
13
14uncommited file to HEAD
git diff <path>
uncommited file to before last commit
git diff HEAD^ -- <path>
last commit to before last commit
git diff HEAD^ HEAD -- <path>
difference between HEAD and n-th grandparent
git diff HEAD~n HEAD -- <path>
Another cool feature is whatchanged command
git whatchanged -- <path>删除远程仓库文件,但保留本地文件系统的文件
1
2
3
4文件
git rm --cached path/to/file
目录
git rm -r --cached path/to/directory撤销代码修改
1
2
3
4git restore <file>
reset all tracked files
git restore .删除未被追踪的文件或目录
1
2
3
4
5
6
7
8
9
10
11查看将要删除的文件
git clean -n
删除未追踪的文件
git clean -f
删除未追踪的文件和目录
git clean -fd
删除未追踪的文件、目录和忽略的文件
git clean -fdx查看指定commit提交的文件信息
1
2git show --name-only <commit-hash>
git show --name-status <commit-hash>
commit
1 | 撤回刚才错误提交的commit |
commit info
1 | commit info format |
amend
In Git, the –amend option is used with the git commit command to modify the most recent commit. It allows you to make changes to the last commit without creating a new one, which is helpful for fixing small mistakes such as a missing file, a typo in the commit message, or an incorrect change.
scenario 1: Fixing a Commit Message
1
2
3
4
5Suppose you made a commit but realized there was a typo in the message:
git commit -m "Fixing a bugg in login"
To correct the message, This will update the last commit with the corrected message.
git commit --amend -m "Fixing a bug in login"scenario 2: Adding Missing Changes
1
2
3
4
5
6
7
8
9You commit some changes but forgot to include a file:
git commit -m "Add login functionality"
Later, you realize that you forgot to add auth.js. To fix this:
1. Stage the missing file:
git add auth.js
2. Amend the commit:
git commit --amendGit will open an editor to let you modify the commit message if needed. Save and close the editor to complete the process.
scenario 3: Change latest commit user info
1
2git commit --amend --author="New Name <new.email@example.com>" --no-edit
e.g. git commit --amend --author="Dongwei <jackblack369@163.com>" --no-edit
Important Notes
- Avoid amending commits that have already been pushed
Amending changes the commit’s hash, which can lead to problems if others have already pulled the original commit.
- Use in Local Development
git commit --amend is best used in local branches before pushing changes to a shared repository.
roll back
1 | method 1:重置当前分支的 HEAD 指针以及工作目录和暂存区的内容到指定的提交,擦除了目标提交之后的所有提交历史 |
branch
1 | 查看分支提交历史 |
更改当前分支对应的远程分支
1
2
3
4
5
6
7
8(optional) If origin/<branch-name> does NOT exist
git push -u origin <branch-name>
Set the upstream of the local branch
git branch -u origin/<branch-name> <branch-name>
Verify the change
git branch -vv拉取远程分支
1
2
3
4
5First, fetch the remote branches:
git fetch origin
Next, checkout the branch you want. In this case, the branch we want is called “branchxyz”.
git checkout -b branchxyz origin/branchxyz**新建分支
1
2
3
4
5
6
7
8
9
10
11
12
13
14
15
16
17
18
19
20To create a new branch from a branch you do NOT have checked out:
git branch new_branch from_branch
To create a new branch from the branch you DO have checked out:
git branch new_branch
To create *and check out* a new branch from the branch you DO have checked out:
git checkout -b new_branch
To create *and check out* a new branch from a branch you do NOT have checked out:
git checkout -b new_branch from_branch
check out a new local branch based on the upstream branch
git checkout -b new_branch upstream/upstream_branch
Create a new branch from that commit by using the commit hash
git checkout -b new-branch-name commit-id
To rename a branch
git branch -m old_name new_name推送新分支到远程
1
2
3
4
5
6
7
81. 将develop分支推送到远程
git push origin new_branch:new_branch
2. 建立本地至上游(远程)分支的链接
git branch --set-upstream-to=origin/new_branch new_branch
如果要推送到的远程分支 origin/new_branch 与本地分支 new_branch 名字相同,那可以使用
git branch --set-upstream-to origin new_branch删除分支
1
2
3
4
5
6
7
8delete branch locally (如果要删除这个分支的话,需要跳转至其他分支后进行删除操作)
git branch -d localBranchName
delete branch remotely
git push origin --delete remoteBranchName
If someone else has already deleted the branch, you just do below
git fetch -p
tag
拉取并切换指定tag 分支
1
2
3
4
5
6
7
8
9
10
11
12
13
14
15git fetch --all --tags
git tag # list all tag
git checkout <tag_name>
- 对指定commit进行标记tag
```shell
git tag <tag_name> <commit_hash>
origin tag
git push origin <tag_name>
push remote upstream repo
git push upstream <tag_name>
该命令会自动触发upstream repo的github workflow根据tag创建分支
1
git checkout -b <new_branch_name> <tag_name>
删除tag
1
2
3
4
5
6
7
8origin
git push origin --delete refs/tags/<tagname>
upstream
git push upstream --delete refs/tags/<tagname>
执行上述任何操作之后,需要清理本地的tag记录
git tag -d <tagname>
conflict
查看冲突文件
1
2
3
4
5
6
7
8Highlight conflicts within files
git diff
List conflict files directly
git diff --name-only --diff-filter=U
Check merge conflicts interactively
git mergetool
staging
1 | check current code diff with current commitID |
stash
stash命令用于暂存当前未提交的代码修改,以便在后续时刻再次应用它们。它可以暂存已修改但还未添加到暂存区的文件,也可以暂存已经添加到暂存区但还未提交的文件。
1 | save stash with describe info |
rebase
1 | optional |
squash/reword commit
提前备份待操作的分支 git branch bk-dev HEAD
merge the last 3 commits into a single commit.
1
git rebase -i HEAD~3
replace all those
pickwithsquash(or simplys) apart from the first one.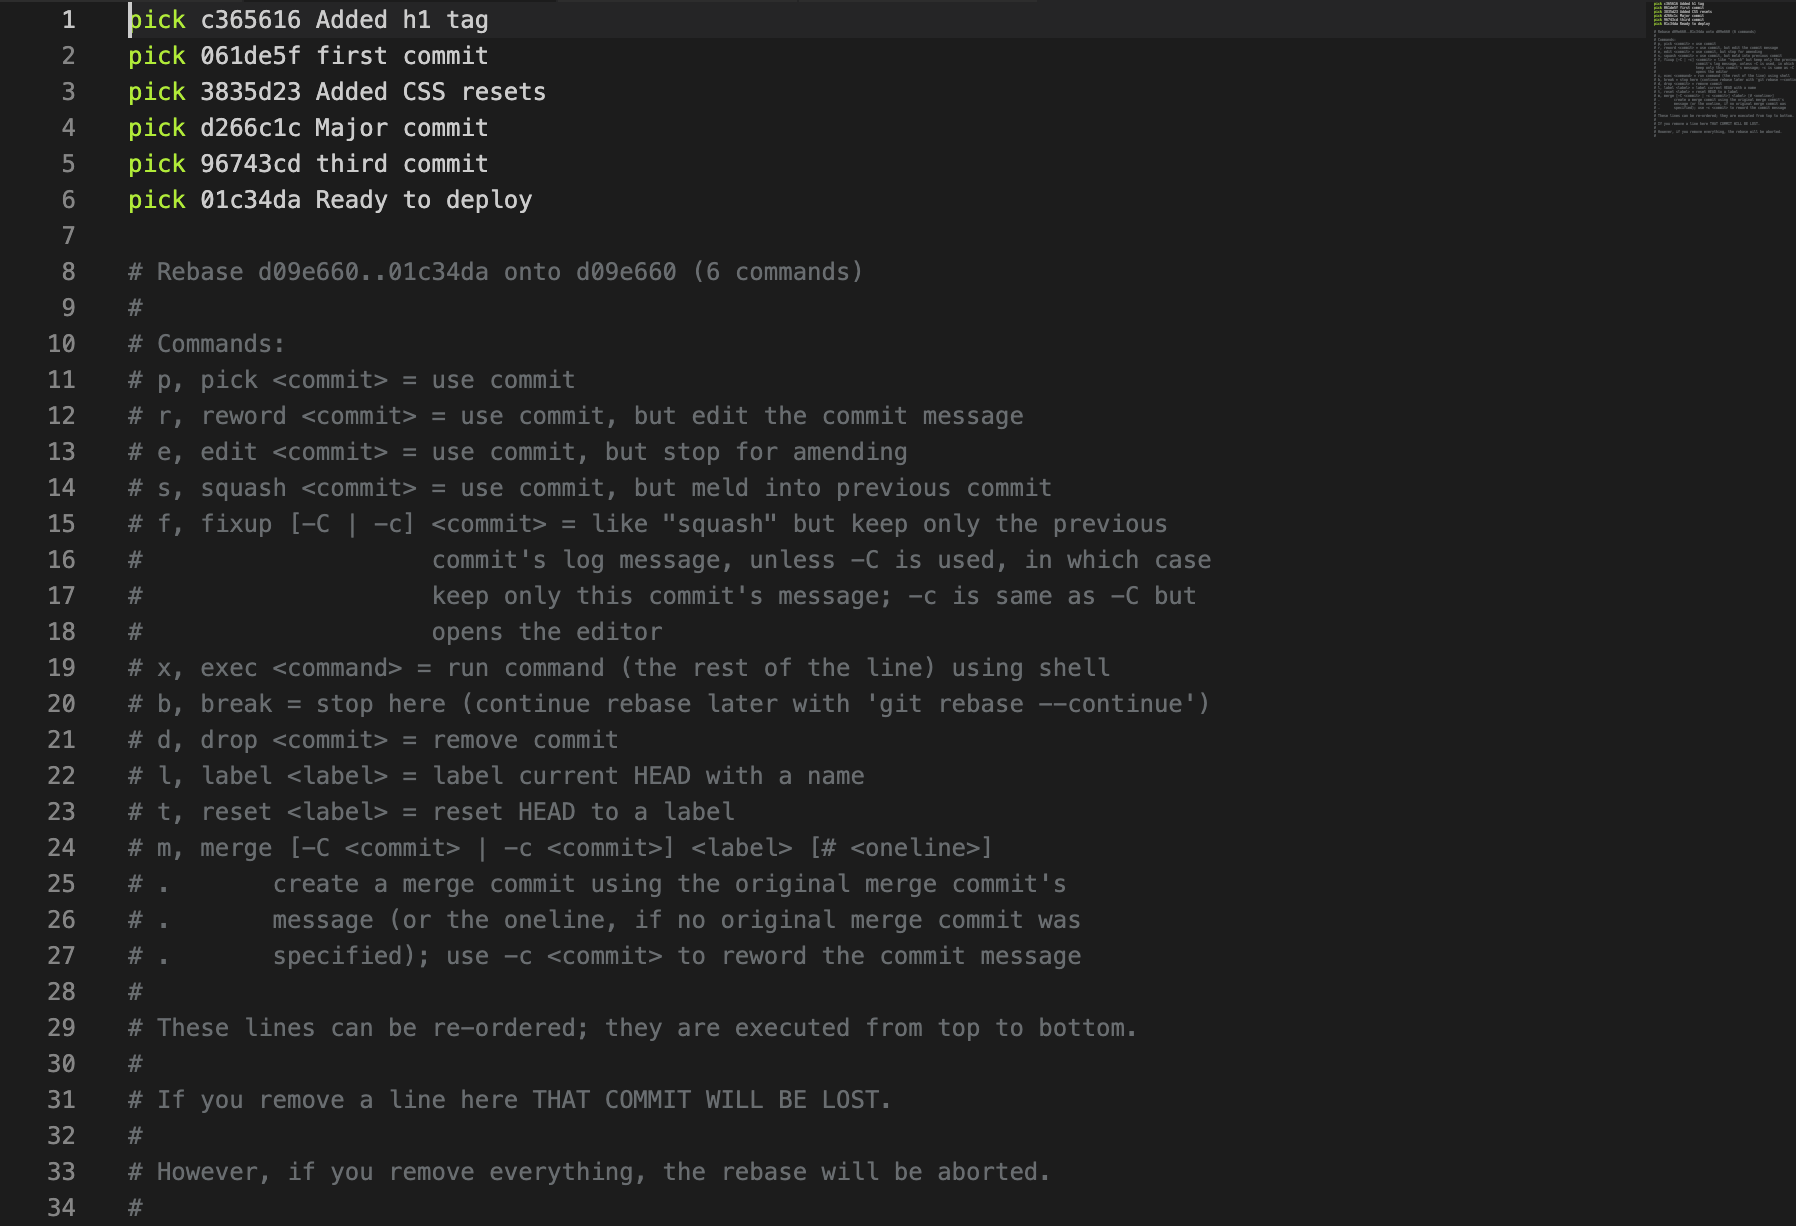
Note:
pickorpwill only use those commits, butsquashorswill use them and combine them all together.The first commit is the one you will combine them into without losing your changes.
注意,一般需要 squash的是后面的commit,需要保证第一条(最早的)commit 信息不被 squash
After doing that, save the file and close it. Git will open up another editor where you can see the new commit message it generates for you.
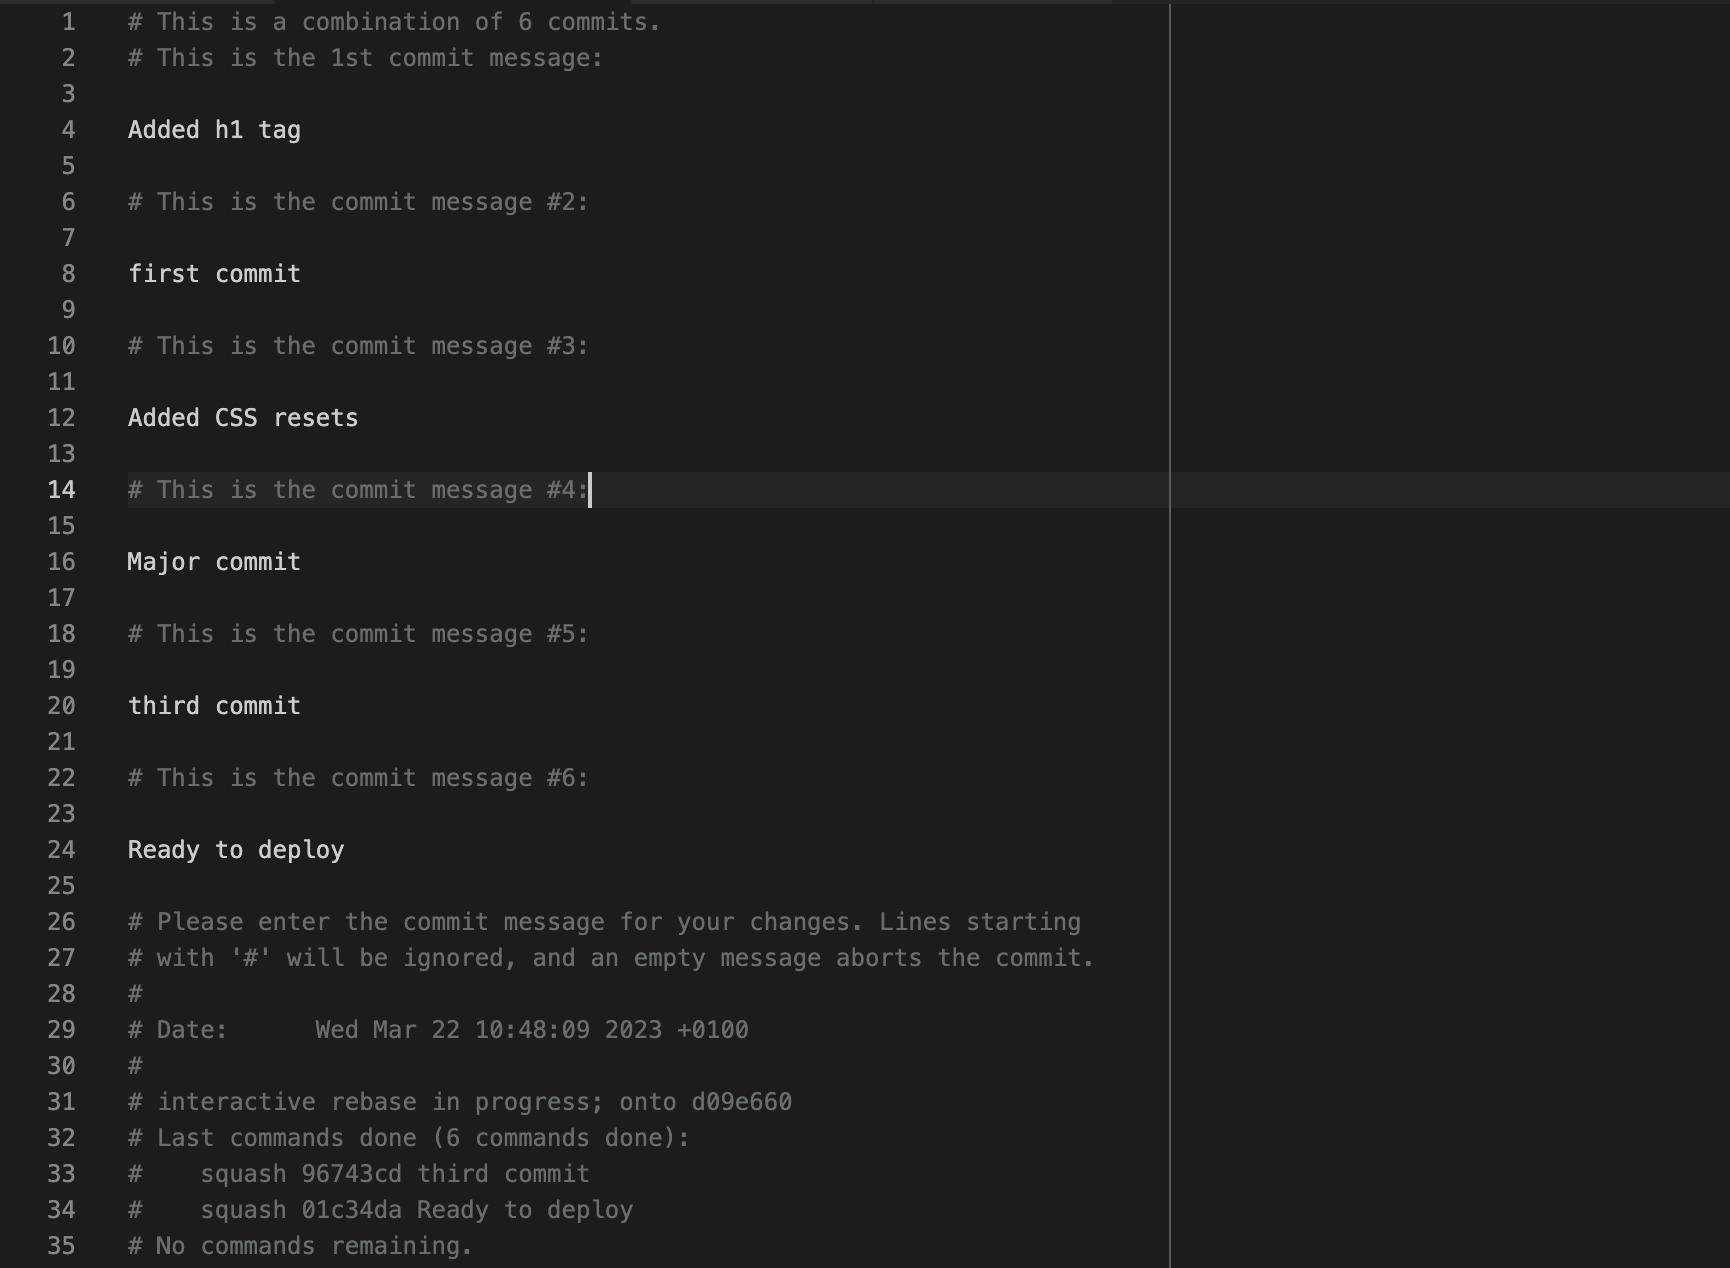
You can get rid of all of them and add your custom message:
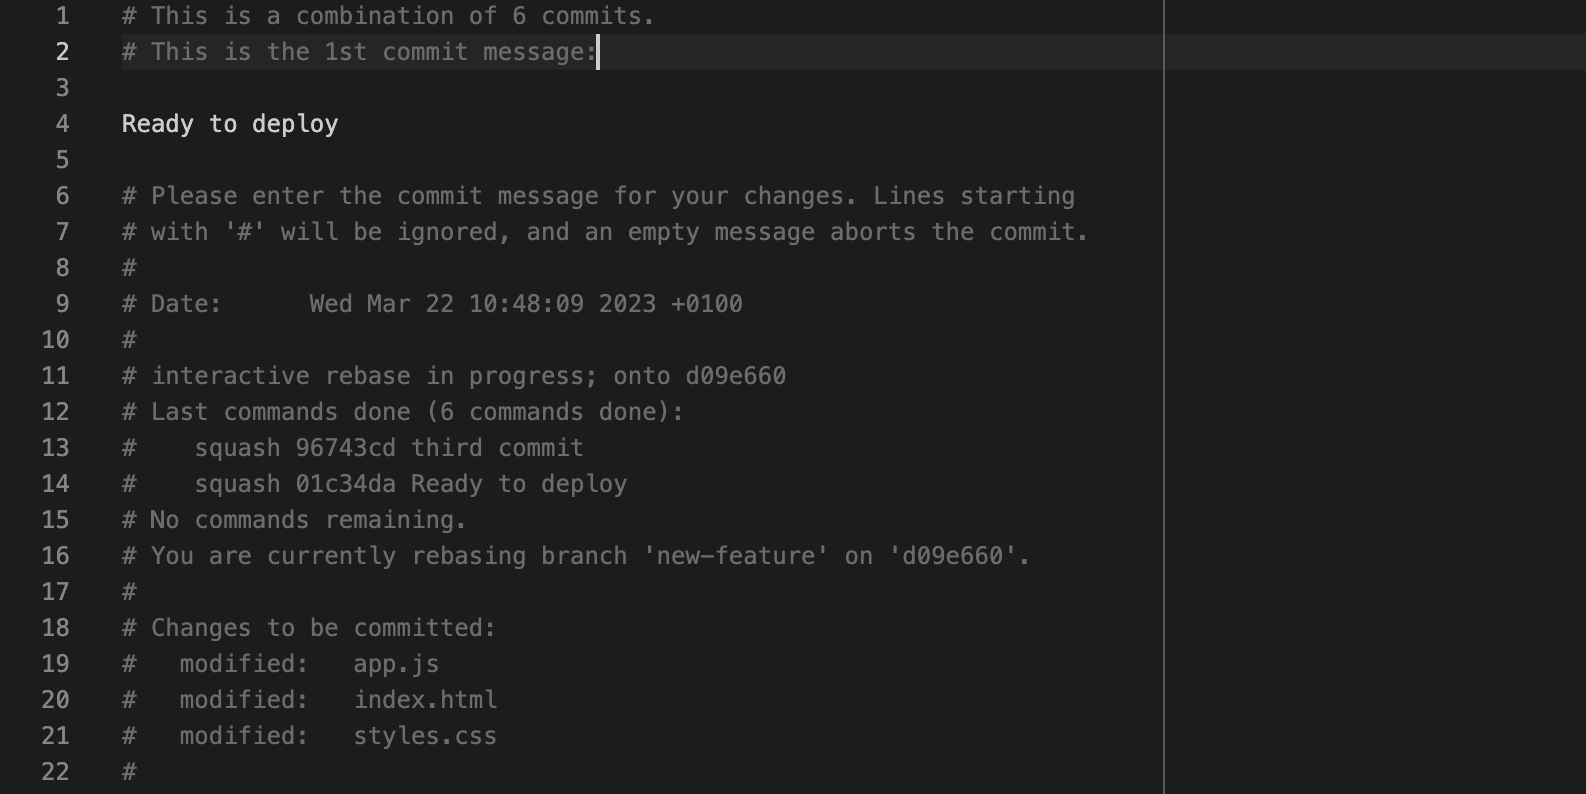
Or you can leave it as is. If you add a new commit message, save the file and close it.
Pushing changes, You should run git push to add a new commit to the remote origin. If you have already pushed your commits, then you should force push them using the git push command with — force flag (suppose, the name of remote is origin, which is by default)
1
git push --force origin HEAD
中途如需终止rebase,运行 git rebase –abort
其它结合
1
2
3
4
5- 先进行 `git rebase upstream/v1` 可以确保你的分支是基于最新的上游代码。
- 然后进行 `git rebase -i HEAD~2` 让你可以在最新代码的基础上修改你的提交。
这个顺序可以减少冲突的可能性,因为你先将你的代码基于最新的上游代码,然后再修改你自己的提交。
remote
1 | List remote |
submodule
1 | init clone with submodule |
cherry pick
If the new commits (commit-4, commit-5, commit-6) are in the feat-alpha branch and you want to cherry-pick them into a clean branch based on upstream/main, here’s how to do it:
1. Fetch the Latest Changes from Upstream
First, ensure you have the latest changes from the upstream repository:
1 | git fetch upstream |
2. Create a Clean Branch Based on upstream/main
Create a new branch starting from the updated upstream/main. This branch will hold only the cherry-picked commits.
1 | git checkout -b new-feature-branch upstream/main |
3. Cherry-Pick Commits from feat-alpha
1 | Locate the hash IDs of commit-4, commit-5, and commit-6 in the feat-alpha branch using: |
4. Resolve Any Conflicts (optional)
If there are conflicts during the cherry-pick process:
1. Git will stop and list the conflicting files.
2. Open the conflicting files and manually resolve the conflicts.
3. After resolving the conflicts, mark them as resolved:
1 | git add <file> |
If you encounter multiple conflicts, repeat this process for each one.
If you decide to abort the cherry-pick entirely:
1 | git cherry-pick --abort |
5. Push the Clean Branch
Once all desired commits are cherry-picked and conflicts are resolved, push the new branch to your forked repository:
1 | git push origin new-feature-branch |
Why This Approach Works
1. Selective Commits: Cherry-picking ensures only the necessary commits from feat-alpha are included.
2. Conflict Management: Conflicts, if any, are resolved once during cherry-picking.
3. Clean PR: The new branch has a clear history, free from irrelevant or duplicate commits.
This ensures a smooth and conflict-free pull request to the upstream repository.
Best practices
合并策略
warning: 不建议在没有为偏离分支指定合并策略时执行pull操作。
您可以在执行下一次pull操作之前执行下面一条命令来抑制本消息:
1 | git config pull.rebase false # 合并(缺省策略) |
您可以将 “git config” 替换为 “git config –global” 以便为所有仓库设置
缺省的配置项。您也可以在每次执行 pull 命令时添加 –rebase、–no-rebase,
或者 –ff-only 参数覆盖缺省设置。
推送本地离线项目到远程github
1 | mkdir my_project |
更改https协议进行推送
如果之前是使用ssh协议进行推送,现改为http协议
查看当前Git项目的远程地址
1
git remote -v
该命令会列出所有已配置的远程仓库地址,并显示它们的读取和写入访问URL。示例输出如下所示:
1
2origin https://github.com/username/repository.git (fetch)
origin https://github.com/username/repository.git (push)其中,
origin是远程仓库的名称,https://github.com/username/repository.git是远程仓库的地址,(fetch)和(push)分别表示读取和写入访问URL。将Git仓库的URL替换为HTTP协议的URL
1
git remote set-url origin http://gitlab.xxx.com/username/repository.git
然后使用以下命令进行Git push操作
后记:需要注意的是,使用HTTP协议进行Git push操作的速度可能会比使用SSH协议慢一些,因为HTTP协议需要建立TCP连接、发送HTTP请求、接收HTTP响应等过程。同时,HTTP协议的安全性也比SSH协议稍低,因此在安全性要求较高的情况下,建议使用SSH协议进行Git push操作。
Git修改.gitignore不生效
在git中,如果想忽略某个文件,不让这个文件提交到版本库中,可以修改根目录中的.gitignore文件
但有时候把某些目录或者文件加入忽略规则,发现并未生效
未生效原因:.gitignore只能忽略那些原来没有被追踪(track)的文件,如果某些文件已经被纳入了版本管理中,则修改.gitignore是无效的
解决方案:先把本地缓存删除(改变成未track状态),然后提交。
1 | git rm -r --cached <要忽略的具体文件或者目录> 或者 git rm -r --cached . |
重新初始化submodule
1 | rm -rf 子模块路径 |